HOW TO CREATE A CWM BACKUP/CWM RECOVERY.IMG FOR ANY MTK PHONE/DEVICES

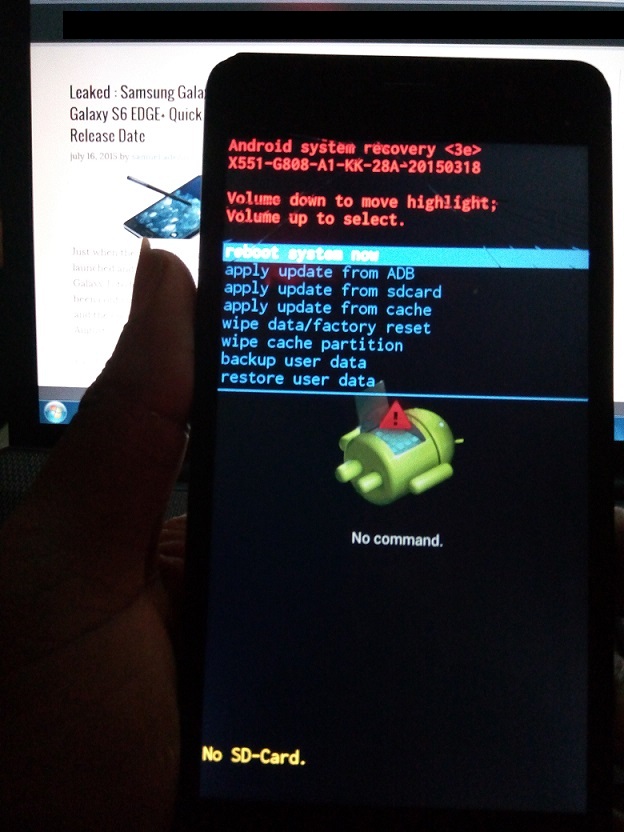
It’s quite disheartening when I see people complaining of the woes having their phone devices bricked without them having a proper stock rom backup via cwm  recovery or having a clockwork mode recovery backup which could have helped them restore their phones back to the last backup before the phone bricks occurrence.

The main item or ingredient neccessary in having a cwm  backup is to get the particular recovery.img  for the phone type..


mtk1.1.1.png


instead of trying to Google for the compatible recovery image posted by someone else for your phone type,  why not just created the cwm recovery by yourself in a couple of minutes {we all know that flashing the wrong recovery.img of someone else on your phone might have adverse effects on the phone itself…
ONCE AGAIN… it is very important to have your android given permision for root shell which is quite different from the phone being rooted..
To do this in a simple way… Just install BusyBox app on your phone…. Grant it root permission once the app is opened and click on the INSTALL prompt by the left… wait for a while while busybox keeps working on your root shell until you get the INSTALLATION SUCCESSFUL prompt…
Close the app and go to the pc for the final steps.
HERE IS AN EASY GUIDE ON DOING THAT….
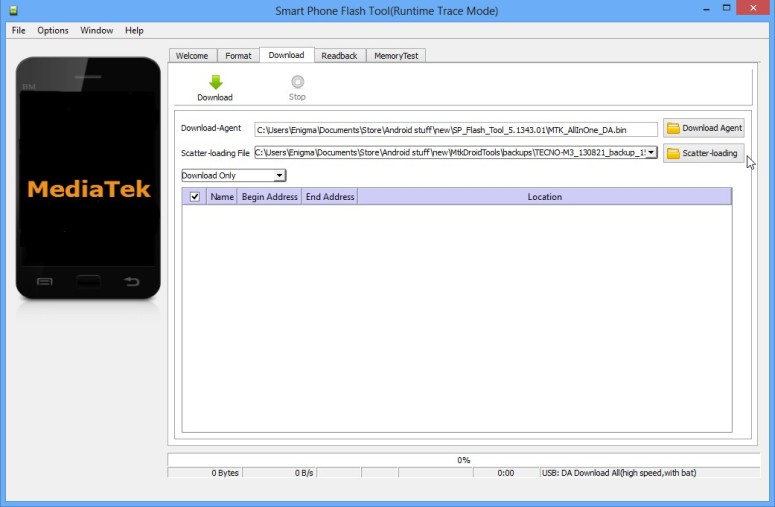
**{tools needed}
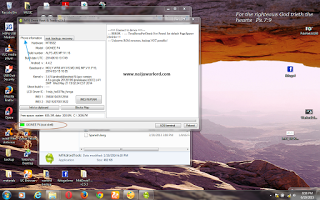
#**MTK DROID TOOLS version 2.5.3 {preferably}..
#** An adb  driver or pda  driver for your phone..(has to be installed and run so as to make the android and pc communicate with one another)
#** root your phone with kingroot{optional cos it can also be rooted using mtkdroid tools}
#**Install busybox  on the phone so as to have root shell access.

(more…)

how-to-setup-mtk-droid-tools-on-your pc

DEFINITION OF TERMS:

1- MTK Androids: MTK android devices are most android devices generally regarded as China androids. Technically speaking, they are those android devices powered by MTK also knows as MediaTEK CPU and chipset.

MTK android devices include;

Tecno androids

Infinix androids

Wiko androids

Gowin androids

Gionee androids

Opsson androids

Most Huawei androids

Some LG androids

Lenovo androids and the likes of them.

2- Servicing MTK Androids: this simply involve the maintenance processes of MTK Android devices such as flashing, formatting and other software repairs of MTK android devices.

ISSUE(S) TO BE SOLVED:

1- Where to download MTK Droid Tools.

2- How to Setup MTK Droid Tools on Windows PC. (more…)

installing complete mtk android drivers

To carryout any maintenance works on MTK android devices, drivers are needed especially; on Windows PC. Although, there are universal drivers installer like the PDanet+ that automatically installs drivers for virtually all android devices, but it does not contain MTK android devices preloader drivers which is actually the main topic for discussion in this tutorial.

DEFINITION OF TERMS:

1- MTK Androids: MTK android devices are most android devices generally regarded as China androids. Technically speaking, they are those android devices powered by MTK also knows as MediaTEK CPU and chipset.

MTK android devices include;

Tecno androids

Infinix androids

Wiko androids

Gowin androids

Gionee androids

Opsson androids

Most Huawei androids

Some LG androids

Lenovo androids and the likes of them.

2- Servicing MTK Androids: this simply involve the maintenance processes of MTK Android devices such as flashing, formatting and other software repairs of MTK android devices.

3- Preloader: preloader is the first partition on MTK android devices. Being the first partition on MTK android devices, it is from the preloader that MTK android devices actaully boot.

An MTK android device with corrupt Preloader is actually dead and may never work again -this is why care must be taken when flashing MTK androids.

4- Drivers: drivers are the files that serve as intermediary between the hardware of your phones and your PC. Drivers aid the interaction and communication between your phone and PC.

ISSUE(S) TO BE SOLVED:

1- How to Download Complete Windows PC Drivers for MTK Androids.

2- MTK Android USB VCOM Installation Guides for Both Windows 64bit and 32bit PC.

SOLUTIONS:

1- Download USB VCOM drivers from any of the mirrored link below.

2- This tutorial contains a concise illustration on how to setup MTK Droid Tools on your Windows PC.

SOLUTION 1: USB VCOM Mirrored Download Links for MTK Androids

Mediafire Link: MTK Android USB VCOM Download Link

Box Link: MTK Android USB VCOM Download Link

SOLUTION 2: MTK USB VCOM Installation Guides for Windows PC

i- The USB VCOM is packed in a zip folder. Download it from the link above and extract it on a folder on your PC. See the image below.

ii- Locate the USB VCOM Installer from the folder as seen in the image below and double-click the AutoRun_Install app.


NOTE:

i- During the installation, Windows may warn you several times of the drivers signature. Simply click “Install Drivers Anyway” to continues. See the image below.

ii- You may have to download other ADB drivers to complement the USB VCOM, to make your MTK Android drivers a whole. I recommend PDanet+ for that.

Once the installation is complete, simply click “Finish“. You may now connect any MTK android device to the PC.

how to flash custom roms on mtk devices without pc

Flashing custom recovery on android devices could help prevent so many disasters especially; on MTK android devices like Tecno, iTel, Infinix and other MTK android devices generally referred to as China androids (at least, by Nigerians). No offence!

Here, I would discuss how to flash a custom recovery on most MTK android devices like Tecno, Infinix, iTel and others using Mobile Uncle application.

Mobile Uncle is a very useful diagnonistic application for most android devices, especially; most MTK android devices. It has a lot of features and can be used to modify MTK android systems, however; most of its functions requires root previlege.

Flashing Custom Recovery On MTK Androids Using Mobile Uncle

1- Download MobileUncle application from GooglePlay store or from anywhere else if you do not already have it installed on your phone.

2- Root your phone if it is not rooted yet. Follow the


guides here to root all MTK android devices.

3- Download the recovery image for your android device.

Please note that the recovery.img has to be for the specific phone.

4- Put the recovery.img you downloaded in the root of the SD Card.

5- Open Mobile Uncle application, scroll to the recovery tab of the application and click it.

6- Wait few seconds for the application to load the recovery.img files on the phone then; select the specific one you downloaded for the phone. A WARNING will pop up, simply click to proceed and wait for the process to complete.

7- Now, reboot the phone to recovery to confirm the process.

Recovery Flashing SAFETY TIPS

It is a good practise to backup your MTK Android stock RECOVERY before you flash any custom recovery on it. You can backup your stock recovery following these guides.


How to Root Android Devices without PC

Android devices are so enjoyable to use, but it can be even more enjoyable if it is rooted. There are so many ways and methods you can use to gain root privilege on your android devices however, not most methods work without the use of your PC.
Here, we discuss how to root your android devices without the use of your PC. This involves the use of just Baidu Root app.

What is Referred to As Android Root

In case you do not know, Android Root, contains some special folders and files in android systems. Meanwhile, gaining access to the Android Root gives you special privileges and rights to perform certain advanced activities on the phone.

How to Root Android Device without PC Using Baidu Root

Baidu Root is an application that can single-handedly root most android devices and it is downloadable from the Google PlayStore.

Follow the guides below to root your android device without PC but JUST Baidu Root app.

1- Download Baidu Root from the link here. Or, from Google PlayStore.

2- Install the Baidu Root application on your phone.

3- Open the application and click on the “A Key to Get Root Privileges” line.

4- Wait for the application to complete the process and give you the confirmation message.

That simple! Your android device has just been rooted.

NOTE

Please note that you need to download any root manager like the SuperSU or SuperUser from the playstore -this is to help you manage and maintain your root permissions.

For any comments or questions over this article please, use the comment box bellow or contact us. And if your questions is not about this article and needs our help over something related, Find Us on Facebook. Got any other info you want us discuss? Share it with us using the comment box or contact us!


How I Fixed / Repair A Bricked Infinix Hot Note X551 Android Phone

Yeppy! Finally, the infinix hot note x551 which was bricked has finally woken up from coma after about 4 days. All process completed and the device is now working fine.

If you have been following my latest posts especially those that has to do with rooting and installing cwm recovery, you would recall I made mention of my infinix hot note x551 hard-bricked. Hard-bricked in the sense that, the phone wasn’t even turning on when placed on charge even for hours. Following that post, I promised to publish a solution on how i fixed the device when the device starts running.

Just before we move to the solution proper, I’d like to share how it happened. Perhaps, it would come in handy for those interested.

Few days ago, I intend doing a factory reset on the phone. My aim was to factory reset the phone to its default state since I barely use the phone considering the fact that I own an iPhone, Blackberry 10 as well as the latest zero 2. Before doing a factory reset, I had to unroot it using the Kingroot app in other to avoid bricking (soft demage). Every thing worked out well and the factory reset process went smoothly.

Just when the phone had fully started up and running smoothly, an update popped up. I didn’t waste time reading the description hence I initiated the download update.

Download was complete and the phone had to restart in other to complete the update. It was during this process, the phone automatically came up with a No Command Error. Ooophs, phone bricked! At that point, the only options displayed were the once shown on the image below:


Bricked-Infinix-hot-note

I had to research on how to unbrick the phone and while following a tutorial online, there was an interruption and the phone became hard-bricked. That means, it wasn’t turning on anymore. Even when connected to the computer and a power outlet. Simply put, no sign of life on the phone. About 4 days later, the phone came back to life, I initiated the flashing process and Voila, infinix hot note X551 is fully back to life and functional.

So, now that you know the story, let’s head-on to how I was able to fix it. This should aid you in case you encounter any issues with the infinix hot note or any other android phone running on MTK (MediaTek) processor.

Repairing Bricked Infinix Hot Note X551

Just before I lead you on the processes involved, let me state down the requirements. It’s best you have all of these in place before proceeding.

Requirements

  • A Computer
  • A working USB cable (preferably the one that came with your phone)
  • SP Flash tool. You can download Here.
  • Infinix Hot Note X551 Stock ROM. You can download HERE.
  • Manually Install VCOM drivers on the computer. You can download the VCOM drivers HERE.

Steps:

==> Using your computer, Unzip the SP flash tool files, the Stock ROM file as well as the MT6577 VCOM Driver files to a folder where you can easily remember on your computer. You can use WinZip software in unzipping the files.

==> Make sure you install the right MT6577 drivers on your computer.

ReadHow To Manually Install MediaTek (MT6577 USB) VCOM Drivers On Windows 7

==> Now, navigate to the folder where you unzipped the SP flash tool files, right click on flash_tool.exe and choose to run as administrator.

==> When launched, Click on the scatter loading option and navigate to the folder where you unzipped the Infinix hot note stock ROM into.

using-sp-flash-tool-2


==> Under the Infinix hot not stock ROM folder, select the MT6592_Android_scatter.txt file.

==> Wait for it to load up. When it’s done loadi

ng, untick the CACHE and USERDATA options an

d click on Download.

repair-bricked-infinix-hot-note-1024x671

==> At this post, make sure your Infinix hot note phone is switched off then connect it to your computer using the USB cable.

==> The program will begin to count. Wait till the count is complete because any interruption whatsoever will make the phone hard-bricked.

repairing-bricked-infinix-hot-note-1024x671

==> When the flashing is complete, you should get a blue box with a white check mark stating download OK.

flashed-infinix-hot-note

==> Click on the x button and close the SP flash tool program.

==> Disconnect your phone from the computer, leave it for like 10 to 20 seconds and then power it on.

Since it’s a fresh stock ROM installation, the booting time will take much longer than usual. Don’t panic, your device is safe.

When the device boots to the start up options, I am sure by then, there should be a smile on your face because you have successfully unbricked your phone.

Unbricked-infinix-hot-note

Above is the picture of the Infinix hot note x551 successfully unbricked and everything is working perfectly fine so far.

If you have any questions or comment regarding unbricking a bricked phone, do ask your questions using the comment form and I will reply as soon as I can.

[TUT]MTK Android (Sp flash tool ) tutorial

What’s needed:

  • USB data cable
  • MediaTek USB VCOM drivers
  • SP Flash Tool ( Latest version MTK Flash Tool v. 5.1343.01 (18.10.2013))


  • First of all, make sure that you have MediaTek DA USB VCOM drivers installed.

MTK Android Flashtool Drivers

Flashing the whole ROM

  • First of all open SP Flash Tool, then click Scatter-loading button to load the correct scatter file
    (MT6575_Android_scatter_emmc.txt or MT6577_Android_scatter_emmc.txt, depending on which phone you have) for your device and ignore any message that may appear.

MTK Android Flashtool

  • Turn off your phone, remove the battery and replace it after some seconds (and don’t turn on the phone).
  • Press F9 (or hit Download button) and connect your phone into the computer via USB data cable.
    The process will start and a red progress bar will appear.

MTK Android Flashtool Connect to Computer

MTK Android Flashtool Connect to Computer

  • After the red progress bar is complete, there will appear a purple progress bar.

MTK Android Flashtool runtime trace mode

  • Right after the purple progress bar is complete, a message will appear underneath it:
    Please insert USB cable in x seconds” and then the download will start right away (you will see the yellow progress bar filling up).

MTK Android Flashtool runtime trace mode

  • When the yellow bar is complete, you’ll get a popup with a green circle and Download OK message,
    which means that the process has been successfully terminated.

MTK Android flashtool Download

  • You can now safely disconnect your phone and turn it on. The process ends here.

Flashing only part of the ROM

  • In case you want to flash just one part of the ROM, that is also possible. In the shown example, only recovery image will be flashed.
    Deselect all parts except the one(s) you want to flash and then press F9 (or hit Download button).

MTK Android Flashtool

  • The tool will immediately show a warning because not all parts are selected, but you should continue anyway. Safely press Yes to continue.

MTK Android Flashtool

  • The download of the chosen partition image will start and after the yellow bar is complete, the popup with the green circle should appear.

MTK Android Flashtool

MTK Android Flashtool

  • Please note that, even though it isn’t mandatory to select it on the list of images to flash,
    preloader file must be present in the same folder as the other partition(s) that you want to flash, or else phone will not be able to enter into download mode.

Attention: Please follow the instructions carefully. I will not take any responsibility on whatever may happen with your phone.

Very important warning: Always make sure that you trust the sources of the ROM you download and know that it is meant for your phone.
After flashing a wrong preloader, your phone will be completely dead (can’t be powered on, it will not charge and won’t be detected anymore by the computer) and there is no way to recover it.

[Tool]SP FlashTool ||MTK Android FLASHER
http://forum.xda-developers.com/show….php?t=1982576
======================
Mediatek – Flash Tool – Info page
Mediatek – Flash Tool – Downlaod page

SP Flash Tool v. 3.1224.0212 (01.11.2013)

MTK Flash Tool v. 5.1320.00 (23.05.2013)
MTK Flash Tool v. 5.1343.01 (18.10.2013)

SP Flash Tool are for SmartPhone products
MT6573\72 Innovative Platform for Mainstream Smartphones
MT6575 Dual-SIM smartphone platform for the mainstream market
MT6577 1 GHz Dual-Core Smartphone Platform
MT6582 Quad-Core Cortex-A7 1.2GHz+CPU Smartphone Platform
MT6589 Quad-Core Cortex-A7 1GHz+CPU Smartphone Platform

MTK Flash Tool is for Feature Phone chips
MT6223 GSM/GPRS solution for ULC/ULC+ market
MT6235 GSM/GPRS/EDGE solution for Mainstream Multimedia
MT6236 GSM/GPRS/EDGE Feature- rich Multimedia solution
MT6238 GSM/GPRS/EDGE Premium Multimedia solution
MT6239 GSM/GPRS/EDGE Premium Multimedia solution
MT6250 Single- Chip GSM/GPRS/EDGE- RX entry- multimedia solution
MT6252 GSM/GPRS/EGPRS entry- multimedia single chip solution
MT6253 Single- Chip GSM/GPRS entry- multimedia solution
MT6255 Single- Chip GSM/GPRS/EDGE- RX Smart Feature Phone solution
MT6268 High- end EDGE/GPRS/WCDMA Feature Rich Multimedia Phone Solution
MT6276M HSPA Data Modem Solution
MT6516 EDGE/GPRS Feature Rich Multimedia Smart Phone Entry Solution

MTK Flash tool v. 5.x fix a critical bug about SP Flash Tool 3.x where the SP Flashtool reads iincorrectly the scatter file of some new mobile based on MTK6582 (error: recovery partition is not flashable).